I know I haven't been posting anything in past three months, but that's the thing about farming! You have no peace till you reach your goal, weather if that is a piece of gear you are after, or pet, or maybe even a badge. I have been working on two posts these last three months, one dungeon from W101 and one from P101. The P101 dungeon was far more interesting, and time consuming too. Yes I am talking about entirely new Pirate's 60 level gauntlet, The Tower of Moo Manchu. Once this post is published it means that I have done exactly 100 runs! Which is a good thing, I had enough time to experience different battle tactics and strategies, and I have a lot to share with you! Since all battles are more or less the same I will just talk about last three fights - Nefarious 5, Terror-Cotta Warrors and Moo Manchu.
Also there is a thing or two you should know for 3rd and 4th floor:
- Don't break the statues on 3rd floor. If you do so, you will gain new enemy for each broken statue. Each enemy has sneak sneaky (ability to hide after each round)
- Try to finish 4th floor ASAP, before the flames take over. The flames will block your line of sight (bad news for ranged units) and damage your team after each round.
Powers and Doubloons you should consider using
- Captain Blood Flames (Power)
- Frozen Tide (Power)
- Spell Power (Doubloon)
- Jackrabbit Juju (Doubloon)
- Critical Boost (Power/Doubloon)
- Weapon Power (Power/Doubloon)
- Health (Doubloons)
- Glacier Doubloons (Only in absence of above mentioned powers)
The Nefarious Five
There are two different strategies I used in here. One with Blood Flames/Frozen Tide and the other one with Glacier doubloons.
(flames have been discolored with photo editing tool for the purpose of this guide)
In this picture is shown scenery where Frozen Tide and Blood Flames are used in same round. The Tide will keep enemies immobilized for one round. Blood flames are doing damage (value depends of your spell power stat) when run into, or when they are activated near opponent after each round. As you see flames are put in that order so when they are activated after each round, they will do damage to multiple enemies at once. My flames with spell power 296 are doing 1184 damage each. In this example Privateer, Bucaneer and Witchdoctor will be damaged around 3,5k hp each (if we say that red flames are mine). So in order to maximize damage dealt to enemies, try placing your flames strategically, so that one flame touches as many enemies as possible. When placing flames, right click on the square you are using, to show your teammate where the center of your flames will be. With this strategy I usually finish this battle in about two rounds.
If Frozen Tide doesn't show, don't hesitate to use flames as obstacles. Put them in the middle of battle board, since Buccaneer and Swashbuckler will rush towards you, they are the first one to die, followed by Musketeer and Witchdoctor.
No Frozen Tide or Blood Flames? Don't despair, you and your team can have a great use of Glacier doubloons. Even thou we can't choose where will Glacier be placed, it has great chance that will trap one of the enemies. This gives you time to position yourself and take out enemies one by one.
All 5 Nefarious enemies are equipped with great set of talents. Going after range unit with range unit, or melee unit with melee unit is not very smart move.
One thing you should also be aware of is that Privateer has Charming Gaze. Meaning that if you get too close to her and try to attack her, she will charm you and convert you to her side. This applies to everyone (players, companions, pets and summons).
If you want, you can get handy badge in here. All you have to do is drink the potion that is set in the middle of the room, and hope that your team will handle Nefarious 5 and you easily. When you are going after this badge, unequip everything and drink potion in first round. By lowering your stats drastically you won't be a threat to your team. No use of lowering your health or discarding powers in your hand, once you drink the potion both health and power will be returned. By getting and equipping The Nefarious 6th Badge, you will get this great cosmetic feature - the Glowing Eyes.

Once defeated, you will have a chance at some very rare and unique drops.
The Nefarious Five loot drop table
| Drop | Type | Stats | Picture |
|---|
| Baron Samedi's Masque | Accessory |
Gives: Soul Harvest +1
|
|
|---|
| Bound Oni's Bulwark | Weapon |
Bonus From: Will
Base Weapon Power: 205
Gives: +15 Armor
Gives: Hold The Line +1
Gives: Increase Base Aromor +1
Gives: Increase Base Resistance +1
|
|
|---|
| Death's Bargain | Accessory |
Gives: Soul Shroud +1
|
|
|---|
| Dragon-Axe of Doom | Weapon |
Bonus From: Strength
Base Weapon Power: 235
Gives: Flames of Corruption +1
Gives: Turn The Tide +1
|
|
|---|
| Masque of the Lotus | Accessory |
Gives: Charming Gaze +1
|
|
|---|
| Nefarious Knives | Weapon |
Bonus From: Agility
Base Weapon Power: 225
Gives: +30 Armor Penetration
Gives: Flanking +1
Gives: Walk in Darkness
|
|
|---|
| Nefarious Novablaster | Weapon |
Bonus From: Agility
Base Weapon Power: 210
Weapon Range: 3
Gives: True Grit +1
Gives: Novablast
|
|
|---|
| Nefarious Staff | Weapon |
Bonus From: Will
Base Weapon Power: 190
Weapon Blast: 3x3
Weapon Range: 4
Gives: Jobu's Ruse +1
Gives:Summon Scorpion Swarm
|
|
|---|
| Turncoat's Cap | Hat |
Gives: +9 Magic Resist
Gives: Increase Base Agility +1
|
|
|---|
| Turncoat's Uniform | Robe |
Gives: +9 Magic Resist
Gives: Increase Base Strength +1
|
|
|---|
| Turncoat's Boots | Boots |
Gives: +16 Dodge
Gives: Increase Base Will +1
|
|
|---|
Terror-Cotta Warriors
Terror-Cotta Warriors are not easy at all. In very first round they Vicious Charge at you, dealing great amount of damage and lowering your accuracy to the point when you and your companions become unusable. I am using two types of strategies in here.
(flames have been discolored with photo editing tool for the purpose of this guide)
First is where I use combination of Frozen Tide and Blood Flames like with Nefarious fight. But unfortunately that is not enough. Once they are immobilized with Frozen Tide, each one of them will use Leviathan's Call, which block 50% of damage to smashy, slashy, stabby and shooty weapons for five rounds. Great way to get past that block is to use Witchdoctor companions (ranged, with Improved Mojo Blast preferably). Since they use Staffy and Spooky attacks, the block doesn't work for them. Move them close to the Warriors, but not to close so they can't reach you, and attack from safe distance.
Again if you don't have the flames or tide, try using combination of Jackrabbit Juju, Critical Boost and Weapon Power doubloons/powers. Even if they charge at you, because of yours and your companion talents (boosted by Jackrabbit Juju doubloon), they might not ever got a chance to reach you.
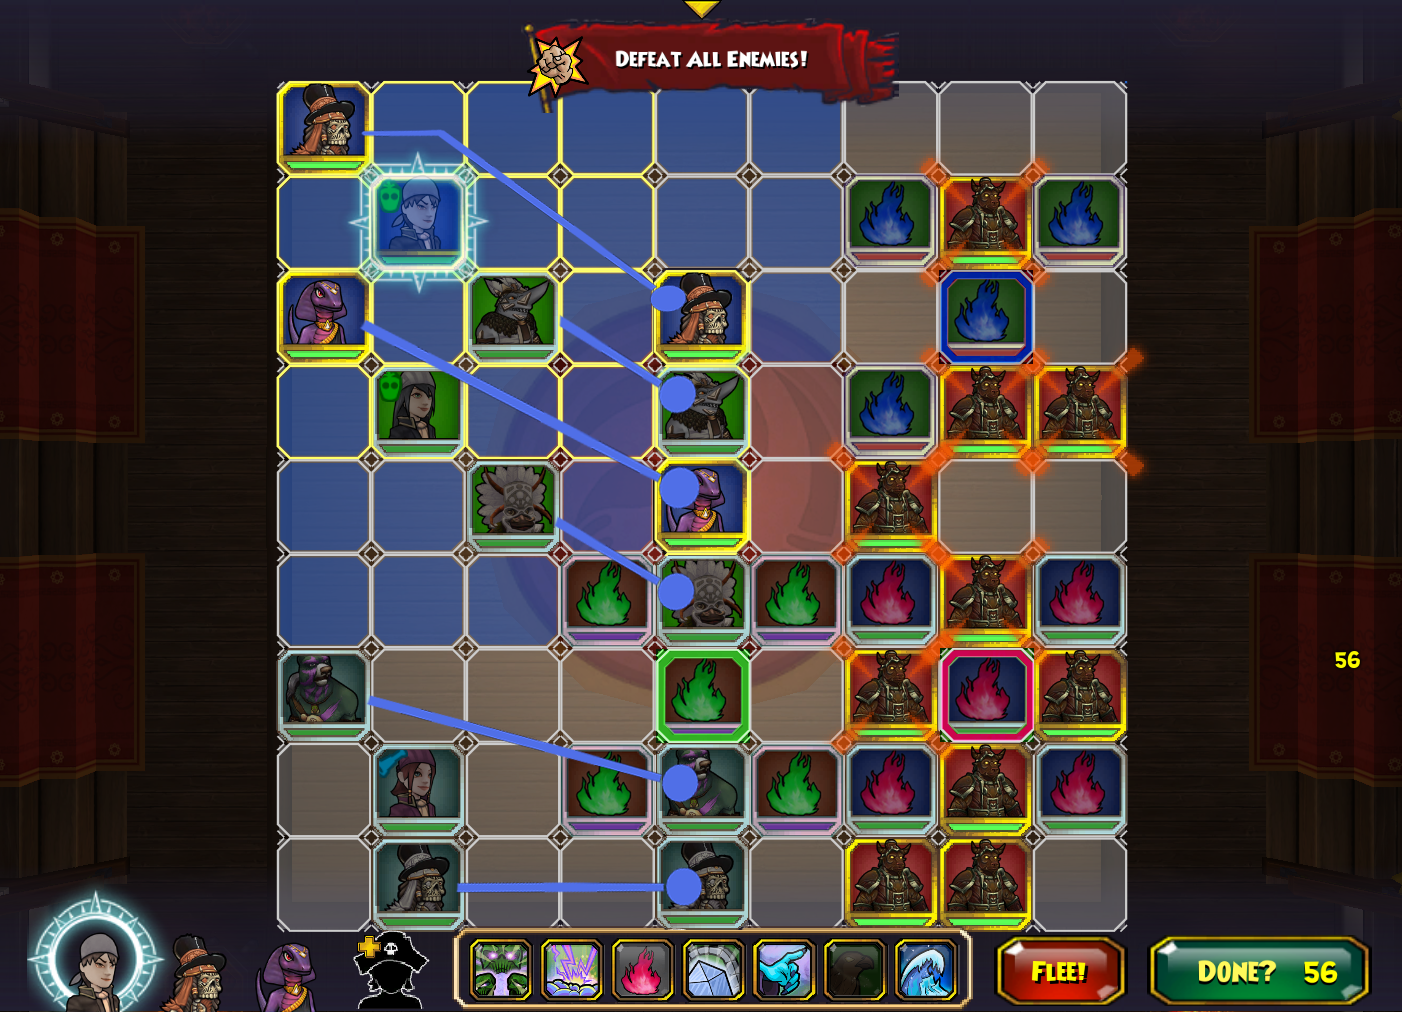
Moo Manchu
I played lots of different strategies here. Even if there are many, I will just mention two of them.
(flames have been discolored with photo editing tool for the purpose of this guide)
First is when your team place three pairs of Blood Flames in same round. You place them as showed in the picture and instantly block the passage towards your team. They will try to come through, but they will only take damage from flames.
The second one, and my favorite is strategy - 300. Love the name! What is special about it? You place only two pairs of flames (at places where red ones are positioned), leaving only one free passage for enemies to pass through. If you get yourself armed with Jackrabbit Juju doubloon, overwatch and repeal boarder talents will activate once enemy comes near you, thus taking out one by one before they land a hit.
Note that you can't defeat Moo Manchu before all of his minions are taken down. Also if player attacks him he will use charm, thus converting him onto his side for a round or two. Only attack with companions! As final boss of this tower, Moo has some really great and unique drops.
Moo Manchu loot drop table
| Drop | Type | Stats | Picture |
|---|
| Imperial Hat of Moo Manchu | Hat |
Gives: +14 Will
Gives: +10 Magic Resist
Gives: Infernal Wave
|
|
|---|
| Imperial Robes of Moo Manchu | Robe |
Gives: +14 Strength
Gives: +49 Magic Resist
Gives: Terror-Cotta Troupe
|
|
|---|
| Imperial Boots of Moo Manchu | Boots |
Gives: +14 Agility
Gives: +18 Dodge
Gives: Frozen Tide
|
|
|---|
Staff of Power
(Witchdoctor) | Weapon |
Bonus From: Will
Base Weapon Power: 195
Weapon Blast: 3x3
Weapon Range: 4
Gives: Increase Base Will +1
Gives: Mojo Mastery +1
|
|
|---|
Staff of Power
(Musketeer) | Weapon |
Bonus From: Agility
Base Weapon Power: 195
Weapon Range: 4
Gives: Increase Base Agility +1
Gives: Suppression Fire
|
|
|---|
Staff of Power
(Privateer) | Weapon |
Bonus From: Will
Base Weapon Power: 235
Gives: Increase Base Will +1
Gives: Dress the Line
|
|
|---|
Staff of Power
(Swashbuckler) | Weapon |
Bonus From: Agility
Base Weapon Power: 193
Gives: Increase Base Agility +1
Gives: Vengeance Shroud
|
|
|---|
Staff of Power
(Buccaneer) | Weapon |
Bonus From: Strength
Base Weapon Power: 235
Gives: Increase Base Strength +1
Gives: Relentless Riot
|
|
|---|
| Ebon Spectre | Pet |
-
|
|
|---|
| Tawny Sky Turtle | Pet |
-
|
|
|---|
The Nefarious 5 and Moo Manchu loot drop table
You can even get some nice badges from this tower, such as:
(Completing the tower one time)
(Completing the tower 10 times)
(Completing the tower 25 times)
(Completing the tower 50 times)
(Completing the tower 100 times)
You can also, always, keep track of my current farming seasons and progress with hashtag #FarmingWithDuncan or by visiting THIS link.
Special thanks to all people who helped me and Katherine to go through these runs, they know who they are. Also I would like to thank to my #twirate fashion models Calamity, Harmony, Johnny, Kyle, Savanaah and Swordroll for allowing me to take pictures of their items. HUGE THANKS to my love Katherine for doing the most of editing job and sleeping through most of our runs (jk).
I would also like to post here few more helpful articles about this dungeon that I had pleasure reading.


.jpg)
.jpg)
.jpg)
.jpg)
.jpg)


.jpg)